I'm a conscientious gardener as far as slug control goes. The pellets I use (copiously) are organic and harmless to birds, hedgehogs, cats etc. They degrade fairly quickly too which is fine.
There's just one little question I have, based on the nocturnal goings on in my garden. They're harmless to cats, birds, hedgehogs etc. Could it possibly be the case that they are harmless to slugs too? I mean, someone checked that.... right?
Thursday, 25 June 2009
Monday, 22 June 2009
Things taking shape! (A spiral shape)

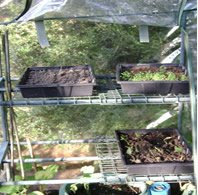
Well, the weather stayed reasonably fine and so the beans and the last of the bedding plants grown from seed went in the ground. The greenhouse now only has a tray of Busy Lizzie's in it, which need a bit longer before going into hanging baskets and tubs.
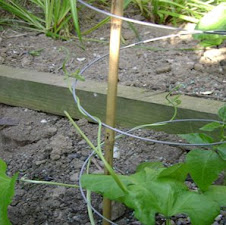
The idea with the Spiraclimb displays was to create height at the back of the flower bed, integrating runner beans to the garden without any trellis support. This is essentially what Spiraclimb was invented for. I opted for canes at the shorter end of the height range but assuming the plants make it, I will demonstrate that they will grow healthily and should provide a very decent crop all being well.
As a growing tip, I must stress how important it is not to twist the growth onto the Spiraclimb support too tightly. It is easy to snap off the shoots if you do (and I did on a couple - but the plant has already started putting out new ones). The Spirals make an attractive feature by themselves but when filled with foliage and red flowers I am confident that the garden will look great with this combination of height and bedding.
The Spiraclimb have been set out in a fairly central position in the bed and are entirely self-supported on the canes. The long hook at the base of the Spiraclimb allows for the cane to be pushed into the soil to a sufficient depth to be sturdy and obviously as the plants take to the support the structure becomes stronger still.
For all its simplicity of appearance, the Spiraclimb is a pretty carefully thought out design. The hooks anchor the support each end of the cane - similar immitations require a hook to be jammed into the soil to anchor the spiral which is nowhere near as simple or sturdy. The base of the Spiraclimb has an "arch" which tucks around the cane and heps provide tension and spaces the spiral correctly up the length of the cane. Finally, the top hook is on a short arm which correctly spaces the top loop of the Spiral out from the cane.
Full details and assembly instructions can be seen in the "How to use Spiraclimb" section of the main website.
Thursday, 18 June 2009
The curse of weeds!
I suppose it was inevitable! The plot has been totally recovered from a "wilderness" state and it was always unlikely that I'd get all the weeds and active roots out. As it is, the recent rain has encouraged widespread sprouting of little seedlings which were definitely not part of my "master plan".
Still, this isn't too bad though it does mean quite a bit of work is needed. The trick, I suspect, is to "get 'em young" which is to say that I pluck out the seedlings root and all before they get better established. Time consuming, but necessary!
Still, this isn't too bad though it does mean quite a bit of work is needed. The trick, I suspect, is to "get 'em young" which is to say that I pluck out the seedlings root and all before they get better established. Time consuming, but necessary!
Monday, 15 June 2009
Birds come to the Rescue!
As I await the opportunity to add my beans to their Spiraclimb supports, it turns out that the various birds nesting in the trees around the Spiraclimb garden have been busy on my behalf!
I've had plenty of cause to cuss them of late since they have developed a fondness for rummaging through the bark chippings under the chairs and table, turfing the bark onto the path in the process. However, this weekend, prompted no doubt by the rain, they have been eagerly demolishing a selection of slugs and snails that were emerging to feast on my bedding plants. I found quite a few shattered shells scattered about.
In this instance, therefore, I am prepared to overlook the continued mess they make with the bark chippings and welcome them instead to wreak revenge on my behalf for the sad demise of several marigold plants!
I did find one slug, however, so huge that any bird who ate it would probably be weighed down and rendered as flightless as the dodo! This "porker" was firmly turfed over the wall into the adjoining field to enjoy whatever wild flowers there might take his fancy.
Monday, 8 June 2009
A drop of welcome rain!
The wet weather has been less then ideal for planned trips to the beach and barbecues, but it has been welcome indeed for the garden. The timing has been perfect to allow my newly sited bedding plants a chance to settle in - though I remain vigilant against slugs!
The beans are thriving in the greenhouse too.
The beans are thriving in the greenhouse too.
Thursday, 4 June 2009
Beans coming along nicely!
 After the false-start the second crop of Spiraclimb beans are showing signs of life! Runner beans are well suited to being grown on Spiraclimb and the spiral shape allows for easy cropping when the beans form. I find that between two and three bean plants can be grown on a single Spiraclimb to provide a dense spire of foliage.
The plan for the Spiraclimb garden is to integrate the runner bean plants into the main flowerbed. A row of four garden canes will provide support for three plants each, providing an attractive backdrop to the bedding plants at the front.
A similar effect could be created using tripod structures but these would take up quite a bit more room. As it is, using Spiraclimb allows me to plant out a very respectable number of plants in a fairly compact space.
You can get a range of tips for growing plants with Spiraclimb on the Spiraclimb website. The site also has a detailed how to use your Spiraclimb section.
Wednesday, 3 June 2009
Health and Safety in the Garden!
 Well, the clearing phase of the project was completed last night - much to my relief - but along the way I have picked up the odd injury!
It turns out that the delicately fronded grass-type plant at the back of the bed is Pampas. This is my first encounter with it. Those who have encountered it immediately make some comment along the lines of "that's a vicious plant!".
And so it is. The leaves have a fine serrated edge to them which, I have discovered, can slice through fingers with ease. Gloves are most definitely advisable when working near/around this plant. Indeed my personal, though biased, suggestion would be "don't plant it in the first place"! Of course, that's mostly because I resent getting assaulted by the plant life.
It has not been an easy task to clear the beds and the Pampas was just one in a series of injuries. I've spent evenings picking bramble prickles out of myself and applying anti histamine creams for allergy reactions from sap (I think Spanish Bluebell sap is an irritant). I was a smidge careless with the secateurs at one point (my fault that one) and to cap it all, I stepped on a wooden plank with a sticking up nail last night! Fortunately, the damage to my foot was minor but next time it rains those shoes ain't gonna cut it.
All quite humerous and taken in my stride but there is a serious point.
Actually, undertaking a big clearing project in a garden is NOT without its hazards. Gloves are a fantastic idea, not just because of the protection from prickles and Pampas, but in general to keep irritant sap at bay. And whilst it might seem excessive, I should probably also check whether I am up to date on my Tetanus protection. Its pretty easy to assume everthing will be ok, but actually Tetanus is common and not much fun to get!
So this post will be my "Health and Safety" missive. Wear the right clothes, avoid Pampas grass, and don't underestimate the chances of infection from rusty nails - check when you last had a tetanus jab.
Monday, 1 June 2009
A busy weekend!
 Phase 2 of the Spiraclimb Garden occurred this weekend thanks to some great weather and an unaccountable surge of energy on my part! Maybe it was the sugar in the donuts I ate or something but in any case, about 3/4 of the plot has now been cleared.
The Spiraclimb garden used, as far as I can tell, to be a vegetable plot tucked away in a forgotten corner of the main garden. It has long since fallen into disuse and had completely overgrown with grasses, brambles, ferns and saplings from the nearby hazel tree. It was also completely covered in bluebells.
Unfortunately, the species of bluebell is Spanish, which is an attractive but aggressive species that is steadily driving out the native variety. I have heavily culled the bulb stock, therefore, transferring a few to pots where they can do no harm. Given the numbers involved, though, I very much doubt that the plot will be entirely free of bluebells!
My initial task has been to clear the plot of overgrowth and aggressive weeds and also to level off the plot for fresh planting. In the past it appears a large tree or shrub was dug out and so the plot has a crater in the middle which, once cleared of overgrowth, will need to be leveled.
Progress so far:
- uncover the path to the garden,
- clear overgrowth from the Cornish stone wall along one side,
- discover/define the edges of the plot (turned out to be a raised bed)
- Set up two mini greenhouses for seeds/young plants
- begin clearing the main bed of overgrowth
- save & transplant some plants from the bed into pots
The idea of the Spiraclimb Garden, aside from giving me a garden space I can enjoy, will be to experiment with using Spiraclimb in the actual beds to bring height and allow for the support of climbers within the garden.
My initial plan is to plant out a crop of Spiraclimb runner beans, if the slugs can be kept at bay. After the first seeds failed to germinate (my mistake - used old seeds!) I replanted and the new crop are just about sprouting now.
For the record, although I am not 100% organic in my approach I have sourced slug pellets that meet organic standards and are not harmful to pets, birds or hedgehogs. They also quickly degrade into the soil. You can get additional tips on growing runner beans with Spiraclimb on the Spiraclimb website.
Subscribe to:
Posts (Atom)